Yesterday, I went through the process of upgrading from Windows 7 to Windows 10 Technical Preview and found how easy it is to upgrade to Window 10. All that is required is to have Service Pack 1 installed and a small file that is approximately 11MB in size which can be downloaded when you sign up for Windows Insider Program, and Windows 10 Technical Preview will appear in Windows update, all it now takes is to click the install button and follow the process until Windows 10 Technical Preview comes alive.
Note: To upgrade from Windows 7 to Windows 10 Technical Preview, your computer must meet the hardware and software requirement which says that your computer must have a minimum of 2.00 GB Ram and Service Pack 1 installed. Also note that the technical preview is for IT pros who are comfortable using unstable software and there could be bug on the OS, as such, you are not advised to install this OS on your main PC, says people from Microsoft.
Once your system meets up with the requirements and the small file is downloaded and installed, you should see "Update to Windows 10 Technical Preview" in Windows update like this image.

Clicking the install button will download the required file which is 2.163 MB in size and start the upgrade process to Windows 10 TP. Yes a file of about 2GB will be downloaded, that means you will need an active internet connection to go through the process. And if you don't like this method, you can try downloading an .ISO file and do the upgrade offline. I have not tried upgrading offline but am sure that there are many articles around the net that can guide you through that process, just google it out.
If you want to know whether you have Service Pack 1 installed, click the start menu and right click on Computer then click on properties, you should see a screen similar to this.
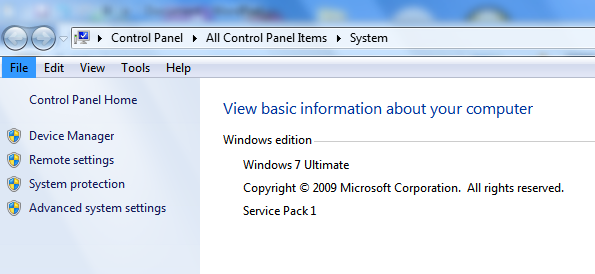
From here, you can be able to tell if you have Service Pack 1 installed or not.
Please ensure you read the terms and conditions in the Windows Insider Program before you upgrade.
Thanks for reading and remain blessed.
Note: To upgrade from Windows 7 to Windows 10 Technical Preview, your computer must meet the hardware and software requirement which says that your computer must have a minimum of 2.00 GB Ram and Service Pack 1 installed. Also note that the technical preview is for IT pros who are comfortable using unstable software and there could be bug on the OS, as such, you are not advised to install this OS on your main PC, says people from Microsoft.
Once your system meets up with the requirements and the small file is downloaded and installed, you should see "Update to Windows 10 Technical Preview" in Windows update like this image.
Clicking the install button will download the required file which is 2.163 MB in size and start the upgrade process to Windows 10 TP. Yes a file of about 2GB will be downloaded, that means you will need an active internet connection to go through the process. And if you don't like this method, you can try downloading an .ISO file and do the upgrade offline. I have not tried upgrading offline but am sure that there are many articles around the net that can guide you through that process, just google it out.
If you want to know whether you have Service Pack 1 installed, click the start menu and right click on Computer then click on properties, you should see a screen similar to this.
From here, you can be able to tell if you have Service Pack 1 installed or not.
Please ensure you read the terms and conditions in the Windows Insider Program before you upgrade.
Thanks for reading and remain blessed.
Comments
Post a Comment