This post is a beginner's guide on how to get started with speech programming in visual studio using c# (c_sharp) programming language.
For those who don't know what a programming language is, in a nut shell,
a programming language is simply a command based computer language used for instructing a computer to do a particular job. When I say job, I mean very complex job.
Write the above definition in an exam and stand a chance of losing marks.
The definition isn't all there is about what programming language is, so I suggest you make a good search to learn what programming language really is.
Though, this article is for beginners but I will say "BEGINNERS ARE CLASSIFIED",
am a beginner. If you are a beginner who hasn't tasted code in his or her life before, I suggest you go start something. A good learning source is "tutorial point", they taught me a lot.
Now for you who have tasted code, you will need the following:

I am doing this with visual studio 2012 express.
open visual studio navigate to File>>New>>Project
expand the Visual C# node and choose windows then select Windows Forms
Application and name it speechee or whatever you want (for the sake of this walkthrough, name it speechee),
am using .Net FrameWork 4.5 you can use 4 if you want, then click Ok.

Notice that visual studio created the project for you with an empty form like this:

We are going to design our user interface on this form. start by dragging SplitContainer from the tools explorer on to the form, it should automatically fill the form but, if it doesn't, open the glyph and click on Dock in Parent container.
//Im4
Add a TableLayoutPanel on the right panel of the SplitContainer. Click the glyph of the TableLayoutContainer and click Remove Last Column. Click on the glyph again so that it closes, open the property explorer and change the Dock property to Fill. Drag the border seperating the up and down so that the downside occupies more of the available space.
//Im5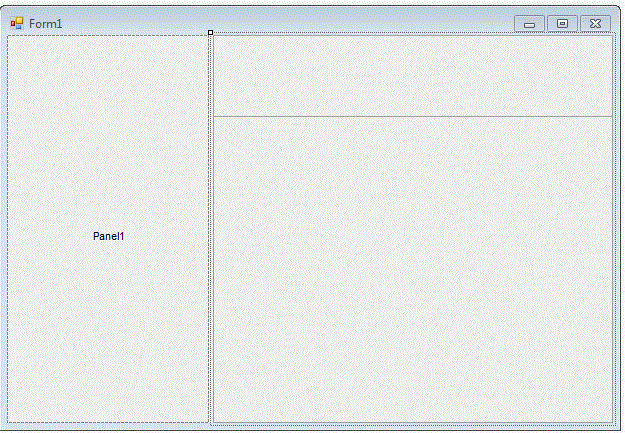
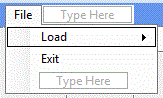
Add a RichTextBox in the downside and let it dock (am sure you are no more a learner on how to do this). Make Form1 gain focus by clicking on its tab and add a MenuStrip control. Type in File, click on the File you just typed and type in Load and Exit Our form will now look like this:
//Im6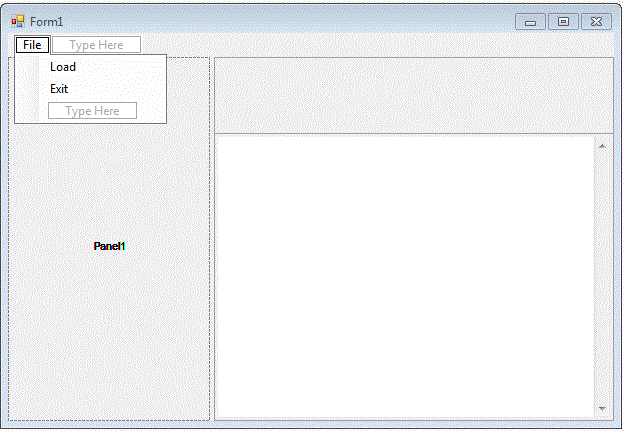
Add three buttons in the left panel of the SplitContainer and change their text property like this: button1=READ, button2=PAUSE and button3=RESUME. (To learn how to arrange controls on a form, check my post "Easy Life With Visual Studio"). On the upper side of the TableLayoutPanel in the right panel of the SplitContainer, add a TableLayoutPanel with three Rows and two Columns add labels and a TextBox in them so that it looks like this:

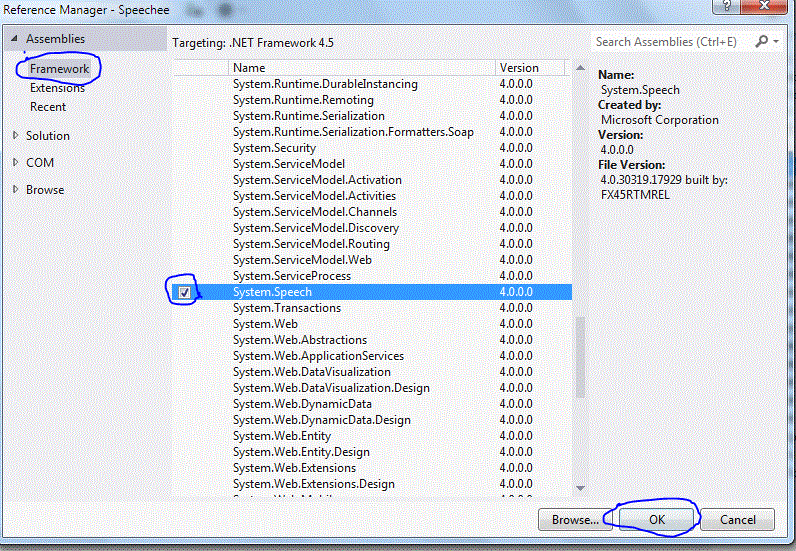
TIME FOR DESIGN IS OVER! Its time to make it work. THE CODE In your Solution Explorer, right click reference and click Add Reference, expand the Assemblies node and choose Framework, look for System.Speech, check the box next to it and click ok.
Go to view and click on code, add this using statement:
Double click the PAUSE button and add this:
and add the following code:
Double click on the Form to open the Load event method put this line in it:
- Computer System running windows 7 or XP ( of course you can't do it with phone).
- Visual Studio 2010 or 2012 (You can get the express edition free, they are available to download on microsoft websites) and sharpDevelop is not bad at all.
- The most important thing you need now is concentration. To help us get the real idea of how speech programming works, we are going to be developing a real program, one I call "RM (Reading Machine)". This little program of ours will read any text you type into its RichTextBox or one you load from file into its RichTextBox. at the end of this walkthrough, you should have a reading machine that looks like this:
Notice that visual studio created the project for you with an empty form like this:
We are going to design our user interface on this form. start by dragging SplitContainer from the tools explorer on to the form, it should automatically fill the form but, if it doesn't, open the glyph and click on Dock in Parent container.
//Im4
Add a TableLayoutPanel on the right panel of the SplitContainer. Click the glyph of the TableLayoutContainer and click Remove Last Column. Click on the glyph again so that it closes, open the property explorer and change the Dock property to Fill. Drag the border seperating the up and down so that the downside occupies more of the available space.
//Im5
Add a RichTextBox in the downside and let it dock (am sure you are no more a learner on how to do this). Make Form1 gain focus by clicking on its tab and add a MenuStrip control. Type in File, click on the File you just typed and type in Load and Exit Our form will now look like this:
//Im6
Add three buttons in the left panel of the SplitContainer and change their text property like this: button1=READ, button2=PAUSE and button3=RESUME. (To learn how to arrange controls on a form, check my post "Easy Life With Visual Studio"). On the upper side of the TableLayoutPanel in the right panel of the SplitContainer, add a TableLayoutPanel with three Rows and two Columns add labels and a TextBox in them so that it looks like this:
TIME FOR DESIGN IS OVER! Its time to make it work. THE CODE In your Solution Explorer, right click reference and click Add Reference, expand the Assemblies node and choose Framework, look for System.Speech, check the box next to it and click ok.
Go to view and click on code, add this using statement:
using System.Speech.Synthesis;
SpeechSynthesizer ss = new SpeechSynthesizer();
if (richTextBox1.Text == "") { label4.Text = "Nothing To Read!"; }
else
{
label4.ForeColor = Color.Green;
label4.Text = "Reading...";
}
ss.Rate = -2;
ss.SpeakAsync(richTextBox1.Text.ToString());Double click the PAUSE button and add this:
if (richTextBox1.Text == "") {
label4.Text = "Pause what? You have no file typed or loaded.";
}
else
{
label4.ForeColor = Color.Blue;
label4.Text = "PAUSED";
}
ss.Pause();
if (richTextBox1.Text == "")
            {
                label4.Text = "Nothing to resume to.";
            }
            else
            {
                label4.ForeColor = Color.Green;
                label4.Text = "RESUMED Reading...";
} ss.Resume();and add the following code:
try
            {
                OpenFileDialog ofd = new OpenFileDialog();
                ofd.InitialDirectory = "c:\\";
                ofd.Filter = "Text files(*.txt)|*.txt|All Files(*.*)|*.*";
                ofd.FilterIndex = 2;
                ofd.RestoreDirectory = true;
                if (ofd.ShowDialog() == System.Windows.Forms.DialogResult.OK)
                {
                    richTextBox1.LoadFile(ofd.FileName, RichTextBoxStreamType.PlainText);
                    textBox1.Text = ofd.FileName;
                    label5.Text = "Loaded";
                    label5.ForeColor = Color.Green;
                }
            }
catch (Exception ex)
{
MessageBox.Show(ex.Message);
}
ss.Dispose();
Close();
Double click on the Form to open the Load event method put this line in it:
ss.SpeakAsync("Hello, My Name is reading Machine. I can read all your text and documents!");
NIce Blog For Linux Learn Python the Hard Way
ReplyDelete